I can't find the original "before" picture. It may be gone, or it may be on the ebook. Where ever it is, I can't locate it- so you will have to close your eyes and picture the kitchen as I first saw it. Avocado green dishwasher. Dark fake wood cabinets with black hardware. Carpet that was supposed to look like mexican tile-main color was brown, but there was some cruddy yellow in there too. Wallpaper with tiny little flowers on one wall, and some hideous faux painting on the other- it was some sort of "ragging" technique-done poorly- in shades of blue. It sort of looked like mold. It was sort of country crap meets spanish faux crap. Here is what we did.
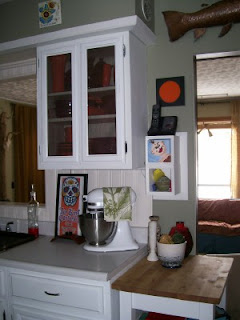
Here is my almost after pictures. This is the south side, from the dining room into the living room. The boxes hide the phone jack and cords. The butcher block thing is a rolling cart from Ikea.

These are the south side of the kitchen. I have 3 2ft sections of counter top. 2 on the south side, and one on the north. There is also a new additional 1 ft section of counter top on the north side now. This is the counter I want to replace. It may look white- but it's actually a white PAISLEY print laminate. It's actually in good condition, so replacement is a low priority- but I still would like it gone once I decide what I DO want.

art by my brother- grego

Below is the south side 2 ft countertop. We bought this butcher block at a garage sale for 5 bucks. Planed it down and used it for this and the 1 ft countertop on the other side of the stove. We are putting beadboard on the the backsplash on this side too- this summer.
You may be thinking- where has she NOT painted? Well, the upper cabinets. I am repainting the cabinets the same color- just in a semi gloss paint this time- to help in the cleanliness department. I liked how satin looked, but it was a bear to clean. So, I am changing the sheen more than the color. So it was an easy choice to stop painting until the weather got better.

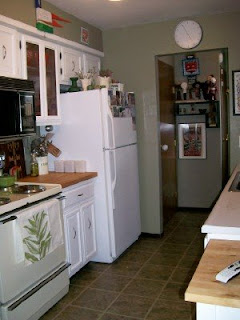
A better view of the north side of the kitchen. Still have the almond stove that came with the house. It works fine. I know it would look better with white- but I am not going to replace a perfectly functioning stove because of the color. The microwave though, is another story. That behemoth is history -asap. It doesn't work some of the time, it's HUGE, the fan doesn't work that well. It's going to have to go this summer too....

Below is the view from the kitchen into the "reclaimed" space that used to be the old dining room. The bar was built last Christmas- yes, I see that black thing with cords under the bar on the left. It's not there anymore. It was temporary and I didn't get it out of view before taking this picture. Shoot me. The counter on the far side of the stove was installed this Christmas. It still needs to be painted, along with the upper cabinets.

A better view of the north side of the kitchen. Still have the almond stove that came with the house. It works fine. I know it would look better with white- but I am not going to replace a perfectly functioning stove because of the color. The microwave though, is another story. That behemoth is history -asap. It doesn't work some of the time, it's HUGE, the fan doesn't work that well. It's going to have to go this summer too....

Below is the view from the kitchen into the "reclaimed" space that used to be the old dining room. The bar was built last Christmas- yes, I see that black thing with cords under the bar on the left. It's not there anymore. It was temporary and I didn't get it out of view before taking this picture. Shoot me. The counter on the far side of the stove was installed this Christmas. It still needs to be painted, along with the upper cabinets.
 So, what we did was-
1. new floor- (about 125.00- new subfloor too)
2. painted cabinets (30.00)
3. I removed the upper cabinets middle wood part and replaced them with copper screen. (5.00)
4. new butcher block countertops on north side (5.00)
5. new , white, dishwasher. (129.00)
6. new light fixtures (62.00)
7. new hardware (24.00)
8. new sink faucet (60.00)
9. new bar table (200.00 ish )
10 new 1ft cabinet (20.00)
11. beadboard for backsplash (60.00)
total so far- 720.00 ish. We used a lot of AX reward certificates for Home Depot on these items so really, it was a lot less out of pocket...
what we still need to do-
1. faux ceiling beam
2. paint upper cabinets
3. beadboard other backsplash
4. new microwave
Eventually-
5. new countertop
6. new sink (when I get a new countertop)
It's still a one person kitchen- but at least it's clean (relatively) and organized!

3 comments:
This really looks fantastic!
Now, for reals -- how difficult is it to paint cabinets?
it's not at all.
1 You take them off. Make sure you label them so you know where they go back- I didn't the first time and it wasn't pretty.
2 Clean them really, really, really good.
3 Sand them a little, then clean them again. I can't repeat that enough.
4 Prime them. I used a brush and regular kilz paint.
5 Paint them. I used a roller for the bigger areas, and a regular brush AND a small foam brush for the smaller sections. You will need something for the doors to sit on while you paint them. I use saw horses, but you can use boxes- they need to be up so you can get the edges, and flat to avoid drips.
6. Don't touch them much for a few days so the paint cures. I put them back up and they cured hanging in my kitchen so it didn't look like a construction zone.
It's like painting a ton of trim. It's annoying, but not hard at all. It's actually harder to put them back up- because they have to be perfectly even to close correctly.
Very nice!!!
Post a Comment